A sewing blog about building a functional, cohesive handmade wardrobe, one garment at a time.

Thursday, August 25, 2016

Paisley Picnic

My youngest niece turned 1 this summer, so it was time to get sewing.  I wanted to sew something that would work this summer and fall, but I didn't have a lot of spare time.  I flipped through my pattern stash and decided to make an Oliver+S Class Picnic tunic and a pair of Playtime Leggings.


Having made both of these patterns many times before, I knew they ran on the larger side for the smallest sizes. My niece is a peanut, so I sewed her the 6-12 month size for both.  I lengthened the Class Picnic by 4" to make it a tunic/dress, and lengthened the leggings about an inch to leave room for growth.


The Class Picnic is made of the last of a gorgeous cotton lawn left over from a maxi dress I sewed for Z last year (man, I wish I had more of this stuff to make myself a top!).  It has a gorgeous hand, and I love the colors.  I accidentally sewed the yokes on inside-out (you are supposed to sew the right side of the inner yoke to the wrong side of the bodice, but I sewed it to the right side of the bodice).  As a result, the understitching is visible on the right side of the garment.  I had already trimmed the seam allowance, so, since the fabric's print obscures the understitching, I decided not to undo it.  I've made this mistake before though - I really need to remember to reference the pattern when I sew this.
 

The pattern instructs you to adjust the shoulder elastic after trying the garment on the wearer - as I wasn't able to do this, I trolled the O+S message board and decided to cut my elastics to 4.5" each.

The leggings are made of the last of a bit of lovely thick 10 oz cotton jersey left over from a tshirt I made my husband this spring.  I cut the waist elastic to 18.5".


Nothing left to say about these.  

Tuesday, August 16, 2016

Striped T-Shirt Dress of Victory

There is nothing earth-shattering about the simple dress I'm showing you today.   And yet, this piece represents a true sewing triumph for me.  I have never "been able" to wear a dress like this before, because I was under the impression that this style - a knit bodice bloused over a cased elastic waistline - simply did not suit me.


I'm pretty psyched to have been proven wrong.

Both my sisters have worn variations on this style every summer for years.  It looks like the perfect "forgiving" shape, right?  And yet, the literally dozens I've tried on in stores have always looked awful on me.  The bodice was always too short and the elastic hit just underneath the bust, maternity style (best case scenario) or (horror) right across the bust line, while the gathers of the skirt made my hips look ginormous.   If the elastic hit at the right spot, the bodice itself would be way too wide.  I self-diagnosed myself as someone with a long torso, gave up looking and just wrote off the silhouette. 


Recently, though, I saw a few lovely Closet Case Files Sallie dresses (particularly the ones by SweetKM and Helen's Closet) and was newly inspired. The Sallie dress pattern is, of course, a bit more sophisticated than mine, but my desire to plunk down $14 for the pattern was tempered by my hard-learned knowledge that my sewing machine really stinks at sewing knits.   I knew the lined bodice would be a disaster.  I also knew I'd need to fit the bodice first.  I wanted faster results.

Kirsten Kimono to the rescue!  I took the pattern pieces from my latest alteration (where I swung out the side seams) and extended them to 43" (I should have extended to about 45" to allow a slightly longer and blousier bodice and to allow for hemming). The total width of each pattern piece at the hem was 30". After sewing it together, I tried it on and very scientifically and systematically bunched it up around my waist with my fingers until I figured out where I wanted the elastic casing to be. Then I chopped the skirt off, and sewed it to the skirt, right sides together with a 3/4" seam allowance. I actually used my coverstitch machine  to do this. My machine does an alright stretch stitch on cotton jerseys, but it detests rayon jerseys (this one is from FabricMart) and won't sew them at all unless there are more than two layers.  Even using stabilizer isn't foolproof.


I serged the ends of the seam allowances without cutting any off, and then I pressed the seam allowance down and stitch the edge to the inside of the skirt with a stretch stitch, forming a casing.  I threaded it with 1/2" elastic and tried on the dress to determine where to cut the elastic.


I think it turned out pretty well.  I'd like the neckline to be a bit lower - I think I cut my neckband a bit too short and that pulled it up more than I wanted.  I do have to adjust the fabric around the elastic casing when i put it on to keep the dress from twisting around - I might sew the elastic down at quarter marks to prevent this in the future.  There's also some excess fabric in the center back of the bodice - maybe this has something to do with that swayback thing people are always talking about? This is a new fitting issue for me.


I've worn it a few times, including out on a beach date with my husband, and in hindsight, I don't know why I thought sewing this dress would be such a risk.  I realized after I started sewing that I didn't actually have a long torso.  The extra length I needed is due to my bust size.  I already know that my shoulder width is proportionally much smaller than it "should" be compared to my full bust - this is why I always do FBAs.  The reason the RTW dresses don't fit is that if I choose a size that fits in the shoulders, there's never enough fabric to cover my bust, whether via dart in a woven fabric or extra length. 


Altogether, I'm pretty thrilled with the dress.  It's a nice throw-on-and-feel-put-together garment, but more importantly, it represents a real coup of sewing vs RTW.  Also nice: It was a pretty cheap sew - the fabric was on sale for $3.60 a yard and I only used 45 inches of my 3-yard cut.


Take that, boob-bisecting, hip-enlarging RTW blouson dresses!  I have conquered you.

Tuesday, August 9, 2016

Beachwear

Greetings from my happy place.


We're having a great time hanging out.  Playing in the surf, digging giant holes, taking long sandy walks, enjoying the breeze on the deck, hitting the fudge shop ...

It is lovely.

We've been vacationing on the Outer Banks since I was a little girl, and now my kids are creating the same memories I treasure from my childhood.  My girls love it so much that they actually started packing for this year's trip the week after we returned from last year's.

It's nearly impossible for me to be unhappy here; even last year, two months after my husband's stroke, I thoroughly enjoyed our vacation.  But this year - man.  This year, the usual joys of the seashore are layered with gratitude and delight.  Last year, we had no idea what our future would hold.  He had trouble walking in the sand, and was only able to venture into the ocean flanked by my brothers.  This year he is running races with G in the sand and swimming alone in the waves.  I just watch and marvel.  It feels as though, every day, I notice something - a new ability, skill, or even just a moment that would not have been possible a year ago.

And I don't forget for a minute how fortunate we are.


And unlike last year, this year I actually had some time to prepare for the trip, including making sure I had some clothes that fit me properly.  The newest additions to my summer wardrobe were these two Fjara racerback tank tops from Pienkel, for whom I tested the pattern earlier this month.

Both versions are tester versions. I made the striped one first, in a size 16 as dictated by my bust size.  It is a bit too snug in the hips.  The anchor print denim skirt I made earlier this spring  sucks in my belly a bit, but if I wear the tank with any of the linen bottoms I made, everything hangs out.  The pattern now includes bust, waist and hip measurements in the size chart so that you can grade between sizes if necessary (I should have graded the hips to an 18). 


The fabric is Riley Blake jersey knit I got from UrbanSew last year.  I had actually put the fabric in time out immediately after it arrived because the stripes are printed, not yarn-dyed, and, well, it turns out I'm a bit of a snob about such things.  Though I sew frequently with printed knits, they don't seem to hold up that well in the wash.  So why would you print a stripe when you could yarn-dye it?

Anyway.  The fabric is really comfy to wear, and the bindings are made of a scrap of Laguna jersey that happens to match the Riley Blake stripes perfectly.


After sewing the striped one, I made a couple of adjustments to the pattern to fix some armhole gaping.  I slashed the armhole and overlapped it 1/4".  When I did this, I cut a line vertically from the hem almost to the end of my armhole slash (leaving a hinge) so that the side seam could swing out freely when I overlapped the arm slash.  In addition to fixing the armhole gape, this gave me the room I needed in the belly and hip area, maybe 2.5" total at the hem.  I also ended up widening the racerback portion of the tank pattern - something Nienke did to the final pattern anyway.


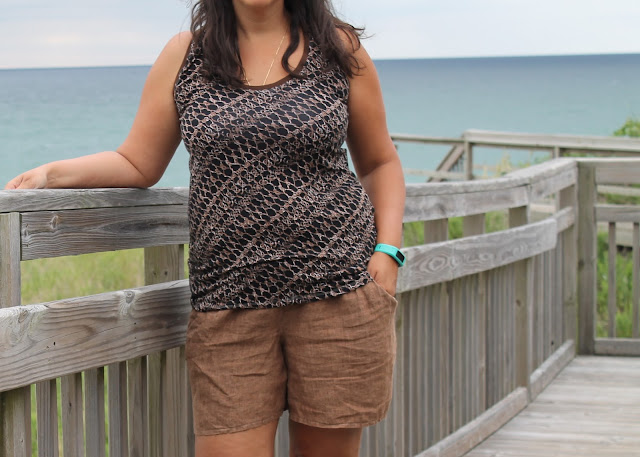
The main fabric is Nicole Miller rayon spandex from the Joann Fabrics remnant bin.  It's printed with rope chains all over and feels appropriately nautical.  It's more of a metallic feeling knit than other rayon spandex I've used, if that makes any sense.  It feels cool to the touch and doesn't really warm up on the skin, which makes it really nice for a summer garment, even in black. I finished the neck and armholes with some brown cotton/lycra ribbing from the stash.  I cut it a little short - and looking at the photos, it also seems that I should have lowered the armholes to their original position after taking the wedge out (the tank feels fine on).  I do wish I'd used black ribbing instead - I think the garment would be a more versatile match for my shorts and skirt wardrobe.  Here I'm wearing it with my brown linen Simplicity 1887 shorts


These tanks are not my usual style choice - I don't have any racerback bras and I prefer not to have my straps showing.  I know they sell little doo-dads to turn your regular bra into a racerback but those have always looked really uncomfortable to me.  In any case, I go a bit more casual at the beach, and these tanks are getting a workout here, straps and all.  They are really comfortable and cool to wear in the humidity.  In fact, the day after I finished my first tank, I wore it on a short 1.5-mile hike with the kids while wearing Niko on my back.  I was surprisingly comfortable despite the heat and nearly 80% humidity that day.


The tanks are perfect beach wear - and being quick to sew, it's easy to whip a few up before vacation.  I am actually wishing I had a couple more to wear while we're down here.  Might need to invest in a convertible bra after all.

Tuesday, August 2, 2016

A palooza of woven tees

I've really been enjoying sewing up more versions of Simplicity 1377.  After I finished my last two, I sewed up three more, using three cuts from the deep stash in the process.


This one is made of a long-stashed white cotton crosshatch shirting.  I added a v-shaped cut out and made a thin bound neckline.  I French-seamed the shoulders and side seams.  I adore this blouse, despite the fact that I made the cut-out facing too small and was forced to stitch it down to keep it in place. It fills a real wardrobe gap for me, providing a pairing with several bottoms that didn't have any good mates.  I like it a lot with the anchor-print pleated pocket skirt I made a couple months ago.


And I am so happy with the fit.  It is just right through the shoulders and bust - with no gaping neckline, no pulling in the chest - and enough ease in the tummy and hips to be comfortable but enough shaping to avoid looking tent-like.  I'm really, really happy with the results of the work I put into adjusting this pattern.


After I made the white blouse, I cut another out of the last of a cut of double-faced gauze that I previously used to make a dress for Z.  I did this one with a shirt-tail-shaped hem and faced the neckline and sleeves with bias made from the same brown linen from my Simplicity 1887 shorts.  I was overzealous in lowering the neckline, though, so I ended up having to put in a modesty panel.  I also messed up while cutting the back, so I had to cut it in two pieces and seam it.


I will be honest, although this top is very comfy and goes well with three of the Simplicity 1887s in my closet, I don't love how it looks.  I'm really annoyed with myself about the low neckline - I don't like how the modesty panel breaks up the plaid, but the gauze is shifty enough that I wasn't even going to try to match the pattern.  I sewed the darts properly and tied them off instead of backstitching.  I also pressed well over the edge of my ironing board.  But they are still pointy - I feel like the fabric is to blame here.  And I don't really like the shape of the neckline. I wasn't even going to post photos of it, but since I do wear it fairly regularly, my blogger conscience compelled me to include them.


Far more happily, I sewed up a third blouse in this J. Crew crepe cotton voile that I bought two years ago for $3 a yard from (where else) Fabric Mart.  I used a facing to create a slit neckline that is tied with the ends of the 1/4" binding that also finishes the neckline.  I also widened the hem a smidge, adding 1/2" at the hem and tapering to nothing at the narrowest point of the top.  I French-seamed the shoulders and side seams again.


I.love.this.blouse. LOVE.  Something about the way the fabric drapes almost makes it feel like it was bias-cut.  I love the tie detail and I love the print.  I wish I had it in five more colors (and am kicking past me for not buying it in the other colorways FM had at the time).

I did, however, have a heck of a time getting halfway-decent photos of this top.  My most successful shoot took place just after a steamy rainstorm, and my camera lens fogged right up.  But these photos show the shape of the top the best, so try not to squint too hard.


I'm not finished playing with this pattern.  Following all my adjustments, I'm really happy with the way the pattern fits, and the silhouette is simple enough that I can see hacking it many different ways.  One that I would like to try soon is a bloused-top, elastic-waist dress similar to the Bettine or the Olivia.  Yes, I could just buy one of those patterns, but since I already have this top altered for my shape, all I need to do is draft the skirt part and I'm set. 


This is my "I'm going to melt because it's 200% humidity out here" face.