A sewing blog about building a functional, cohesive handmade wardrobe, one garment at a time.

Tuesday, May 26, 2015

Meet Niko

He's here!


And he's a he :)


We would have been thrilled with a girl, too - it's been a long time since there was a baby girl in the house and I really love the name we had picked out for her.

But now we're fielding even teams and I love that our house will always have a girls' room and a boys' room.  Plural.  And Gabriel gets a brother.


Thursday morning I woke up feeling crampy and wondering whether this was finally it (I was due Friday).  By about 1 p.m. I was pretty sure I was in labor.  The kids were already at my sister's house, so I made some food, did all the laundry in the house and got the bedroom ready for the birth. 
 

The midwives arrived around 6 p.m. Thursday and Niko was born at 1:47 a.m. on Friday, which was a feast day in the Orthodox Church honoring Saint Nicholas.  That was pretty amazing since we had planned to name a potential baby boy after the saint all along.
 

Nicholas is a family name - my brother, uncle, great-uncle and grandfather all share the name. My mother really wanted the tradition to continue.

I wish she were here to see him.


Labor was more difficult than I had anticipated, it being my fourth birth and all.  Dilation took awhile and I had that can't-do-this-anymore transition feeling well before I reached "official" transition.  But I finally got him out.  After I had pushed his head out, the midwives said something to me, and I answered, and the baby swiveled 180 degrees in the direction of my voice.  That did not feel good.  But the midwives thought it was pretty neat.  I wish I had seen it but I was too busy, you know, pushing and all.  He was 7 lbs 13 oz and 20.5 inches long.


I can't believe I have four kids.

Earlier in the pregnancy, Natasha wasn't sure she wanted another sibling.  But she came around.


Zoia positively glowed when she held Niko for the fist time.


Gabriel is fascinated by his little brother.


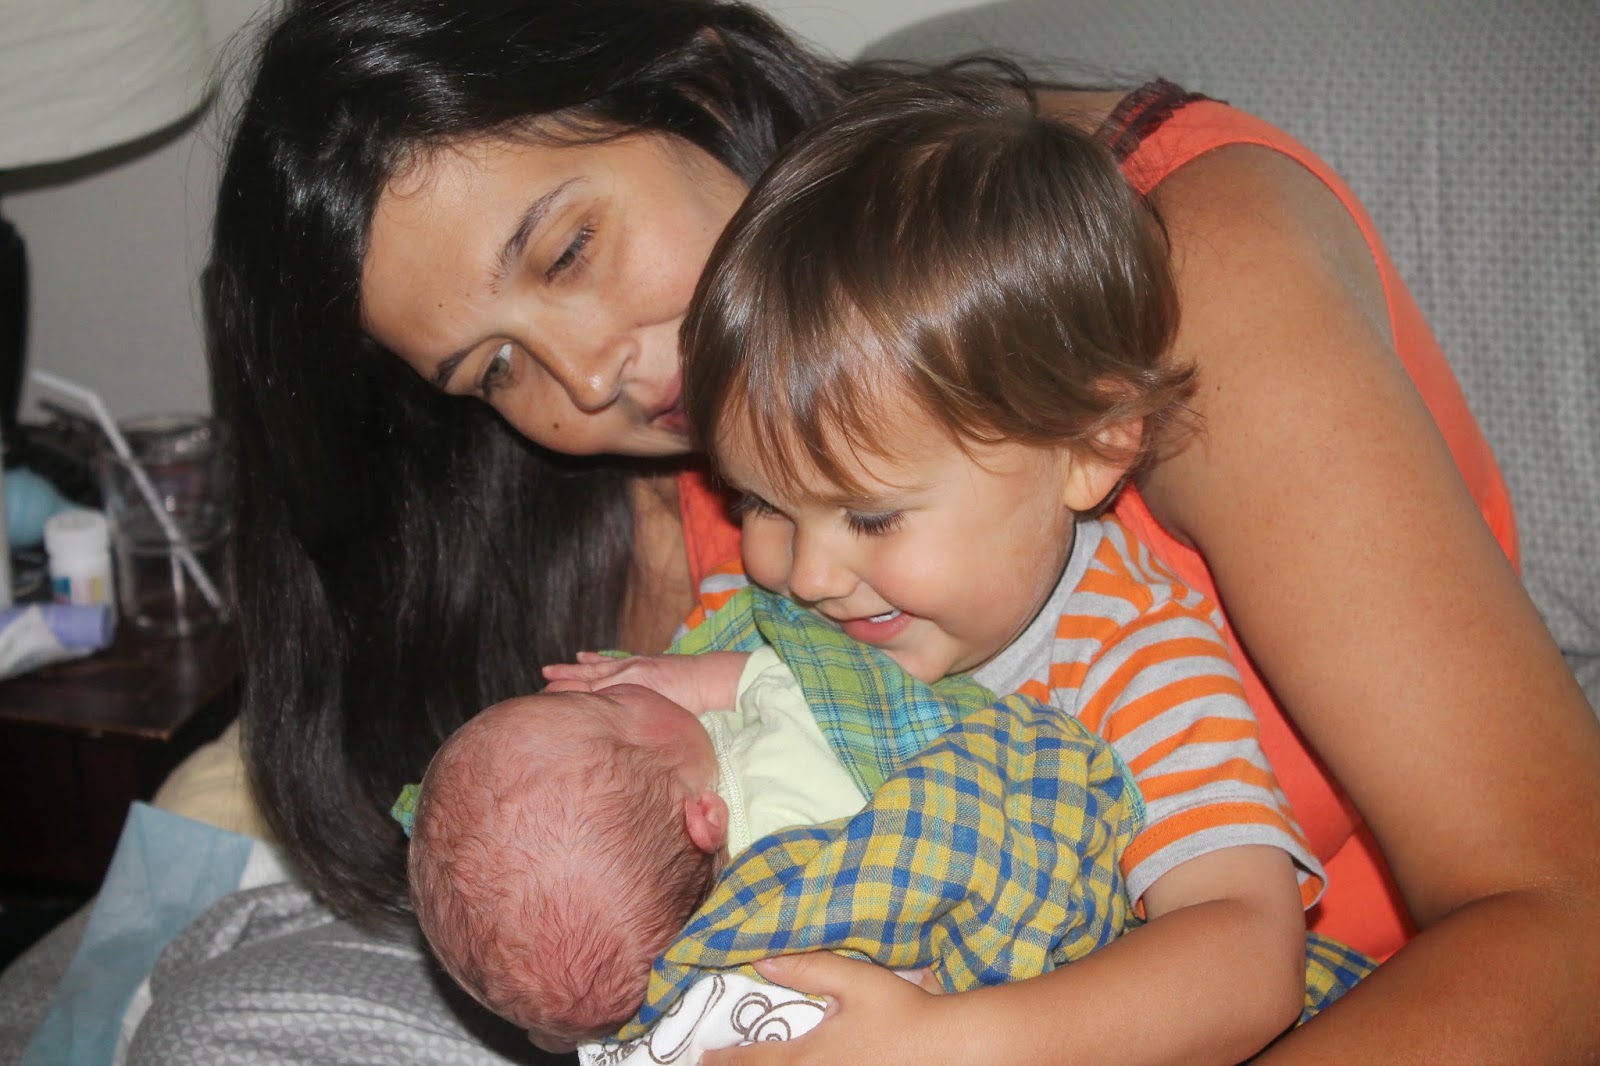
And I am just overwhelmed with gratitude.


Thursday, May 21, 2015

Floaty Boho Maxi Dress


This is the second Boho-Maxi Dress I cut out during KCW.  I used a gorgeous floaty cotton voile from the stash (originally purchased from FabricMart and intended for a blouse for myself) and cut the skirt panels a smidge wider than the pattern dictates, in order to use all the width I had.  Big sister is thrilled with her dress.  


It is a bit sheer so I plan to add a short lining to the skirt using the 20" of voile I have left.


It's not the most practical dress for a 5-year-old, to be sure.  Too long for the playground, too bare for church (unless it's cool enough inside to wear a cardigan on top).  But she loves it and wants to wear it all the time. 


I don't blame her.  If I could pull off a halter-style dress like this (can't, novelty bras never work out for me), I would make myself one too.


It just looks so fun and breezy to wear.


Nothing left to say about this dress - it's an adorable and quick sew.  Go make one!

Monday, May 11, 2015

Booties, blankets and bras, oh my!

Sunday night, I had the panicky realization that there was exactly one pair of baby socks in the house.  It's kind of silly - I mean, it's been 80 degrees here the past week and tomorrow the temperature is supposed to soar to 90 and steamy.  I don't realistically think we're going to have much use for socks.  But all I could think of was Oh-my-gosh-this-baby-could-come-at-any-time-and-his/her-feet-are-going-to-freeze!  


So I did what any sane pregnant woman with a sewing habit would do.  I got out of bed, went down to the sewing cave with my one pair of hand-me-down baby socks and made a quick pattern from it.  Then I sorted through my knit scraps (because you need, like, no fabric to make these) and assembly lined them out.


They aren't perfect - they have this sort of weird ducky-foot shape.  I don't love the seam up the back of the cuff.  I initially tried to attach the cuff differently first by sewing it into a circle and then seaming that to the top of the sock.  Trust me when I say that was way too fiddly for 1 a.m. and possibly for any time.  These cuffs are only 3.5" in circumference!  You might notice that the navy polka-dotted pair has two different cuffs.  I sewed one of them right sides together by accident - again, 1 a.m.  By the time I noticed it, everything was serged together and I wasn't about to unpick that seam.  1 a.m.


And yes, one of those pairs is pink.  I found the pink polka-dotted scrap and couldn't resist making them.  Mama intuition about the gender? I guess we'll see.


This weekend I also made a swaddle blanket out of the same double gauze I used for this Lullaby Layette set.


I cut the blanket 48" square and finished the edges with a narrow hem.


I made a quick wonky star appliqué using the reverse side of the gauze.


It's very soft and light.


Finally, I made two more pieces of nursing sleepwear from the Sweet Blossom Lingerie pattern - a gown and a camisole.  I shortened the straps on the gown, thinking that would add more support, but honestly it just makes my back hurt a little bit to wear it.  Not the best move.  I made the camisole using a yard of cotton/lycra jersey I bought a couple of years ago and then had no idea what to do with.  I fully lined the backs of the garments and partially lined the fronts. 


I got to use some of my eBay lingerie elastic.


The garments are definitely prettier this way but I'm finding the elastic a little scratchy against my arms.

Friday, May 8, 2015

Nesting (for myself)

With my first two children, I wore Bravado nursing tank tops at night.  I soon sized out of those tanks, though - they top out at an F/G and were no longer comfortable to wear any time, let alone at night.  And I can't forgo nursing pads at night if I don't want to wake up in a puddle, so I need something to keep the pads in place.  After my son was born, I invested in a nursing sleep bra.  It was not supportive at all but it did the job and I wore that thing right out.  It occurred to me this time around that I could probably make two or three sleep bras for cheaper than I could buy them, so I went searching for a pattern.

I found one - the Sweet Blossom Lingerie pattern.  For $7, you get four patterns - a sleep bra, nursing camisole, nursing gown, and a midriff cover.  The pattern comes in six sizes - but they aren't number sizes - rather they are named after flowers in the spirit that all women are beautiful.  A sweet thought but when I was cutting I kept forgetting which flower I was supposed to be.   I don't have that problem with my number size.  Plus the smallest size is named after the smallest flower - the violet - and the largest size after the largest flower.  So it's all still based on how big you are.


But I digress.

The pattern is supposed to fit up to a C cup, and includes directions for an FBA, including a handy-dandy cutting line built right into the pattern.  For my muslin, I made a 2-inch FBA onto the size that corresponded with my high bust.

Whomp whomp whomp.

It was way too small.  I needed more coverage on the sides and in front.  It probably would have taken me several iterations to figure out how exactly to alter it to fit me better, but then I remembered that the pattern came with a seemingly random pattern piece for a size 32I/34H/36G.  There is no mention of this piece in the instructions, and it is the only additional size offered, but as it turns out, it was the right size for me.   A comparison of that pattern piece and my own FBA pattern piece (which should have been roughly the same, but were not) revealed that the pattern is actually not that easy to size up to the much larger cup sizes - it requires more than just the simple FBA outlined in the instructions.


I sewed my first bra out of some Free Spirit Essentials cotton/lycra jersey from the stash.  I serged the elastic directly to the neckline and armholes, and did not turn it over, because I wasn't sure whether I could afford the 1/2" loss in coverage (turns out I can). I used 3/4" plushback elastic for the underbust because I was skeptical that 1/2" would be sturdy enough for my girls. I think that was the right move, and 1" elastic would have been even better. I serged the elastic to the right side of the bottom of the bra, then turned it out so the elastic shows. The result is not particularly pretty (especially not on my dress form, whose bra I had to stuff with fabric scraps to get it to approximate my shape) but it is functional and that is what I am going for. 


Having got the fit down, I next cut out the sleep gown.  I recently scored big at the G Street Fabrics $2.97 table, and one of the things I picked up was this gorgeous melon-colored mystery knit.  It has fantastic recovery but still drapes beautifully.  It doesn't feel plasticky at all.  I'd guess it's a rayon or viscose blend with lycra and maybe some cotton.  I wish I had more!


I serged the raw edge of the neckline, then turned it under and sewed some brown ruffle elastic to the right side of the fabric. Worked perfectly. I didn't have any more plushback elastic so I used 1/2 inch as per the pattern for the underbust seam. I think this works ok for the gown.  I followed the pattern instructions for attaching the elastic to the armholes and waist, and I finished the hem with a lettuce edge by turning over and stretching the fabric whilst zigzagging. I'm really pleased with the gown and plan to make one more this week.


Lastly I cut out one more sleep bra using some fabric scraps.  I lined the back fully, hoping for a little more support, and added some side support pieces to the front (it didn't work at all).  t had some picot-edged elastic to use for the neckline, but I had to use 1/2" for the under bust as that was all I had on hand.  It definitely doesn't work as well as the 3/4" I used for the first one.  But I have more lingerie elastic on the way (thanks eBay) so I will be all set to make another when it arrives, hopefully tomorrow.


I should note that none of these items are really at all supportive in my size.  So if you are larger busted and are looking for something you can wear out of the house I'd keep searching.  But I tested the bras out by putting them on and rolling around in them - the girls stayed put and did not fall out, and as that is main goal I'm calling these projects a win.  I'm already wearing the bras around the house because, at 38 weeks pregnant (!!), my regular ones are just torturous.  Now if that elastic would arrive so I could make more ...

Linking up to Gray All Day.

Tuesday, May 5, 2015

Houndstooth pants

Right before our February trip to Disney World, I sewed up a storm.  I made a few tulle O+S Onstage Tutu Skirts for the girls and some quick maternity separates for me.  The day before the trip I decided that the boy needed something too.


I didn't have time to draft a new size of my other go-to trouser patterns, so I decided to use the O+S Sunny Day Shorts pattern (size 3T) with added length.  When I tried the unhemmed pants on him the morning of the trip, I didn't like how they looked, so I threw them into the WIP basket, where they sat for two and a half months.

Blue Steel.

During KCW I finally hemmed them (that is all that was left to do!), and I'm actually quite pleased with the result.  I don't really remember what my beef was with the fit of the pants back in February - maybe they were too big.  He has grown a bit lately.


I cut the pieces from a scrap of heavy-weight houndstooth shirting (at least, that is what Robert Kaufman calls it; feels more bottom-weight to me) left over from my Amish Washi Dress.


I added front and back pockets, and lengthened the pattern.  I didn't get a photo of the pocket linings, but they are gray-and-white gingham.


He is is a big fan of the front pockets.


I like the houndstooth pattern a lot for a little boy.


It dresses up for church, but it also looks great with sneakers and a t-shirt - it kind of has a funky skater feel to it when styled more casually.


Hi ho Silver!

Friday, May 1, 2015

More baby stuff

I sewed most of these clothes months ago when I was in super-nesting mode, but I left most of the knit items unfinished due to frustration with my machine's refusal to hem the thin jerseys.  Bolstered by my knit sewing successes during KCW, I finally pulled them out and finished them.  I had limited myself to stash fabrics (with a special emphasis on using up small scraps) for the gender-neutral newborn layette, and here is what I came up with.  Fabric from Girl Charlee.


The t-shirt in this set is an XXS from Simplicity 5316, modified to remove the unnecessary side snaps (I've always been able to get it over the head just fine without them).  The pants are from a Made By Rae tutorial which I modified by lengthening the rise (to make more room for fluffy cloth diapers) and adding a yoga-style waistband (more comfy than elastic, and easier to sew with my serger).  I drafted the hat pattern.


This t-shirt and pants both from the same Simplicity 5136 pattern.  The pants (which are supposed to be 0-3 month size) look particularly huge so I don't know how they will fit for a newborn.  This wasn't meant to be a matching set - again, stash remnants (almost all from Girl Charlee)!  The hat pattern is my own.


This cloud fabric is a soft and comfy modal/cotton/lycra blend hat my machine really did not enjoy sewing.


These swaddles are from a free Lotta Jansdotter pattern.  I made the owl print one first but it seemed small so I lengthened the pattern for the second swaddle.  The outers are woven cotton prints and the inners are soft cotton knit.


My oldest loved swaddles, but the other two hated them, so I'm not sure how much use these will get.


Don't mind the wrinkles, they've been rolled up in a basket for months.